Create a dynamic NFT with p5.js
Use p5.js to render data from an NFT that holds global game state in a table.
We want to now write a simple web app that will be used to dynamically render a single NFT in our collection. When the NFT renders, the web app should check the requested token, grab the latest data from Tableland, and render some dynamic content.
This tutorial is a continuation of our smart contract tutorial found here: Build a dynamic NFT in Solidity.
If you aren’t familiar with p5.js, it’s an awesome little JavaScript library for getting creative. Check out their website and examples for inspiration.
Prerequisites
- Completed the steps & tutorial to build a dynamic NFT in Solidity.
- (Optional) for pushing to production, sign up for an NFT.Storage account
Setting up your p5.js app
To start this tutorial, we’re going to lean on some great starter content written by others. Follow the instructions in How to use p5.js with Typescript and webpack.
When you are finished with the tutorial, you should be able to run npm run start and see the simple data viz in your browser.
Looking for more? Check out the page on how to build an NFT, including additional resources like defining an optimal SQL table structure.
Customizing p5.js for an NFT
One of the pioneers of p5.js for creating NFTs was Artblocks. If you want to learn more about what they’ve done and their recommendations, we definitely recommend joining that community. For our purposes, we’re going to keep it rough and simple so you can get a hang of using Tableland to render live data.
Updating the HTML
After the above tutorial, you should have the following index.html file:
<!DOCTYPE html>
<html lang="en">
  <head>
    <meta charset="UTF-8" />
    <title>P5 Project</title>
  </head>
  <body>
    <script src="bundle.js"></script>
  </body>
</html>
Let’s just get this ready for a full-bleed token. We’ll add a black background that will match our canvas where we draw the data. So your html after title should have the following style:
<title>P5 Project</title>
<style>
  body {
    background: black;
  }
</style>
A basic p5js NFT canvas
Your index.ts file should currently look like the following:
import * as p5 from "p5";

export const sketch = (p: p5) => {
  p.setup = () => {
    p.createCanvas(400, 400);
  };

  p.draw = () => {
    p.background(220);
    p.ellipse(50, 50, 80, 80);
  };
};

export const myp5 = new p5(sketch, document.body);
Let’s first replace the p.setup step with a new setup and another windowResized method.
import * as p5 from 'p5';

export const sketch = (p: p5) => {
    p.windowResized = () => {
        p.resizeCanvas(window.innerWidth, window.innerHeight);
    }
    p.setup = () => {
        p.createCanvas(window.innerWidth, window.innerHeight);

    p.draw = () => {
        p.background(220);
        p.ellipse(50,50,80,80);
    }
}

export const myp5 = new p5(sketch, document.body);
Great, now our canvas size is a bit more dynamic.
Next, let’s prepare some global variables in the header. The purpose of each is recorded in the inline comments.
import * as p5 from "p5";

// The points from tableland we'll need to render
let points: Array<{ x: number, y: number, id: Number }> = [];
// The current token id. pulled from http://url/#{id}
let tokenId = +window.location.hash.substr(1).replace("/", "");
// Some anchors in the canvas to help offset and scale the points
let anchors: Array<number> = [];
// A function we call on each canvas render or resize to recalc anchors
const updateAnchors = (w: number, h: number) => {
  let dmin = Math.min(w, h) - 8; // 8 just gives some buffer
  // How to scale raw x,y for our token. recall, x & y are between 0 and 512.
  let scalar = dmin / 512;
  anchors = [
    w / 2, // Screen midpoint
    h / 2, // Screen midpoint
    scalar,
  ];
};

export const sketch = (p: p5) => {
  // ...
};
We’ll want to update our setup and windowResize methods to recalculate those anchors.
p.windowResized = () => {
  updateAnchors(window.innerWidth, window.innerHeight);
  p.resizeCanvas(window.innerWidth, window.innerHeight);
};
p.setup = () => {
  updateAnchors(window.innerWidth, window.innerHeight);
  p.createCanvas(window.innerWidth, window.innerHeight);
};
Awesome. We’re ready to start drawing!
Getting table data
First, it’s time to install @tableland/sdk in your project.
npm install @tableland/sdk
Now, import it in index.ts your imports will now look like:
import * as p5 from "p5";
import { Database } from "@tableland/sdk";
Finally, it’s time to update your p.setup() function to pull data from Tableland whenever the canvas loads.
p.setup = () => {
  updateAnchors(window.innerWidth, window.innerHeight);
  p.createCanvas(window.innerWidth, window.innerHeight);

  // Connect to the Tableland network with a read-only connection
  const db = new Database();
  // Run a SQL select on our project table
  db.prepare("SELECT * FROM <your_table_name>")
    .all()
    .then((data) => {
      // Format and store our data in the points[] array
      points = data.results.map((d, id) => ({ x: d.x, y: d.y, id }));
    });
};
That’s it, you’ll have have Tableland data in your app. It’s time to draw it.
Rendering table data
To render the data, we’ll rewrite the p.draw() function to loop over the points and render them on our canvas.
p.draw = () => {
  // black background
  p.background(0);
  for (let pt of points) {
    // Magenta
    p.fill(255, 51, 255, 155);
    if (pt.id === tokenId) {
      // Aqua
      p.fill(0, 178, 255, 211);
    }
    p.noStroke();
    // Use the anchor and scalar to render a square space
    let nx = (pt.x - 256) * anchors[2] + anchors[0];
    let ny = (pt.y - 256) * anchors[2] + anchors[1];
    p.ellipse(nx, ny, 10 * anchors[2], 10 * anchors[2]);
  }
};
With those updates, you should be able to re-run npm run start and see the same canvas below rendered in your browser.
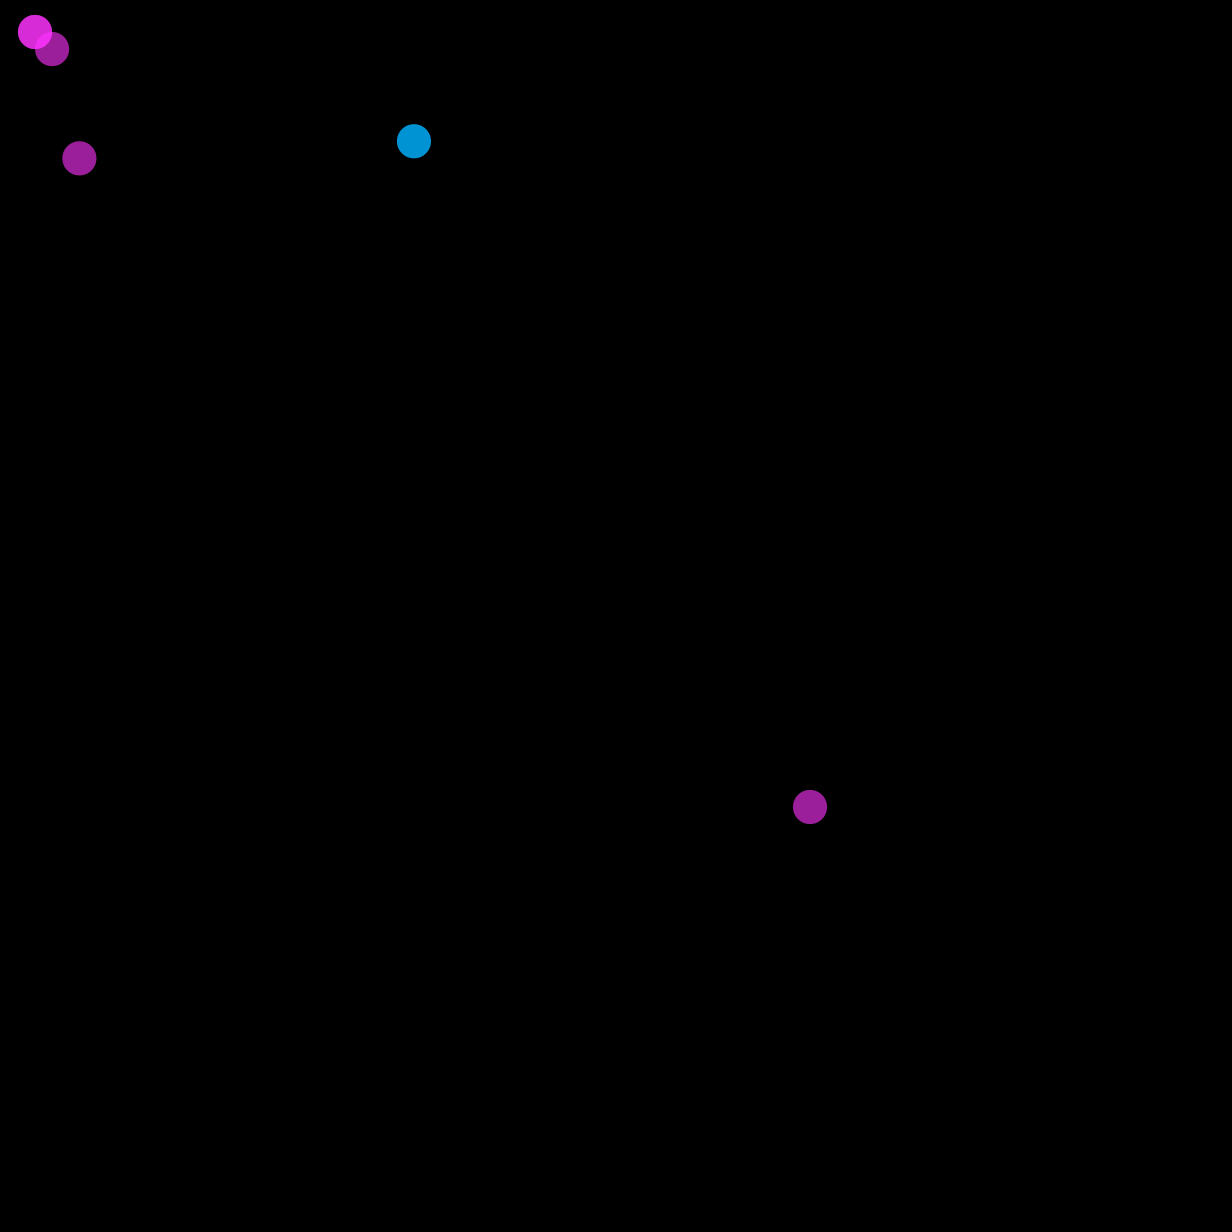
You may not have the aqua point highlighted. To see the token view for any single token, you need to change your url to [https://localhost/#{id}](https://localhost/#{id}). So to see tokenId=1 as shown above, you’d go to [http://localhost/#1](http://localhost/#1).
Package for production
The tutorial above left your project with a couple more config steps to get ready for production.
Change webpack to production
In webpack.config.js change mode: "development", to mode: "production",.
Add a build script
in package.json add a new method to your scripts, _"build"_: "webpack build". So, your full script options looks like:
"scripts": {
    "test": "echo \"Error: no test specified\" && exit 1",
    "start": "webpack serve --open",
    "build": "webpack build"
},
Run the build
npm run build
The full project should now be build in the dist folder. The last step is to upload that to https://nft.storage/ and get your IPFS CID back.
Next steps
- Add user interface controls that allow a token owner to move their pixel and then call the
makeMove()function on the smart contract. - Add the
tokenURIback to our original project so that our NFT collection renders in OpenSea and other platforms.