Build a dynamic NFT in Solidity
Create an onchain game that uses SQL queries to create and populate a table of game state.
Tableland enables ownership & onchain rules to dictate table state mutation. For every mutation, the data is accessible with offchain queries that can be displayed in an interface, such as an NFT-based game board. This tutorial walks through the basics of Solidity ERC721s and an app with shared state. Note that in the second part of this tutorial, you'll use p5.js to add a visualization component to the app!
Overview
Let's create a small onchain game. In the game, we’ll allow the owner of an NFT to update only specific properties of their NFT dynamically (and for those updates to appear on all marketplaces, platforms, and wallets that display the NFT).
Suppose in this game that you are a pixel moving around a 512x512 canvas. The game would consist of users, the pixels they own, and the coordinates of those pixels. An interface may include a 512x512 canvas that renders your and others' locations.
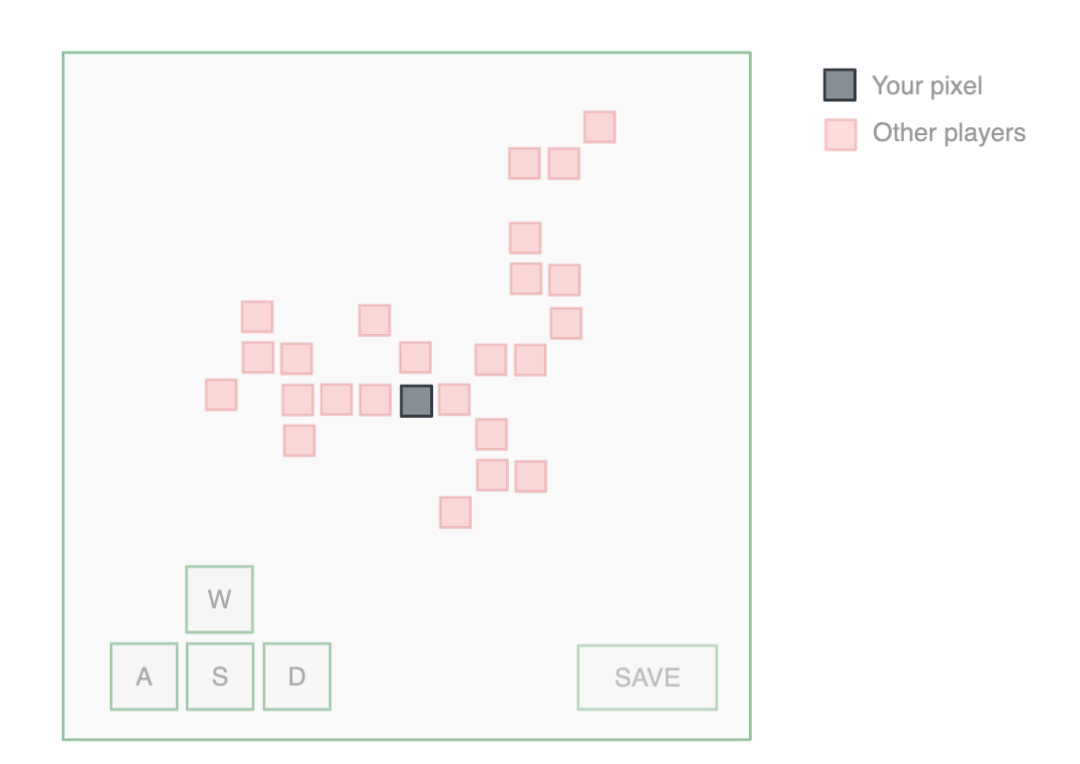
When you build the game, you want users to own their pixels as an NFT. So, we can think of the game's architecture in two parts. The first part is an ERC-721 smart contract where users can mint pixels and then update the coordinates of pixels they own. The second part is a web app that displays the live locations of all the minted pixels and provides an interface for each owner to move their pixel. Today, we'll cover just the first part.
The data's simplicity would make it great fun to build fully onchain, but we'll use it to illustrate the basics of creating a smart contract that owns and populates relational data tables. Let's go!
Looking for more? Check out the page on how to build an NFT to view additional resources for developing on Tableland, such as ERC721 compliant metadata standards.
The NFT design
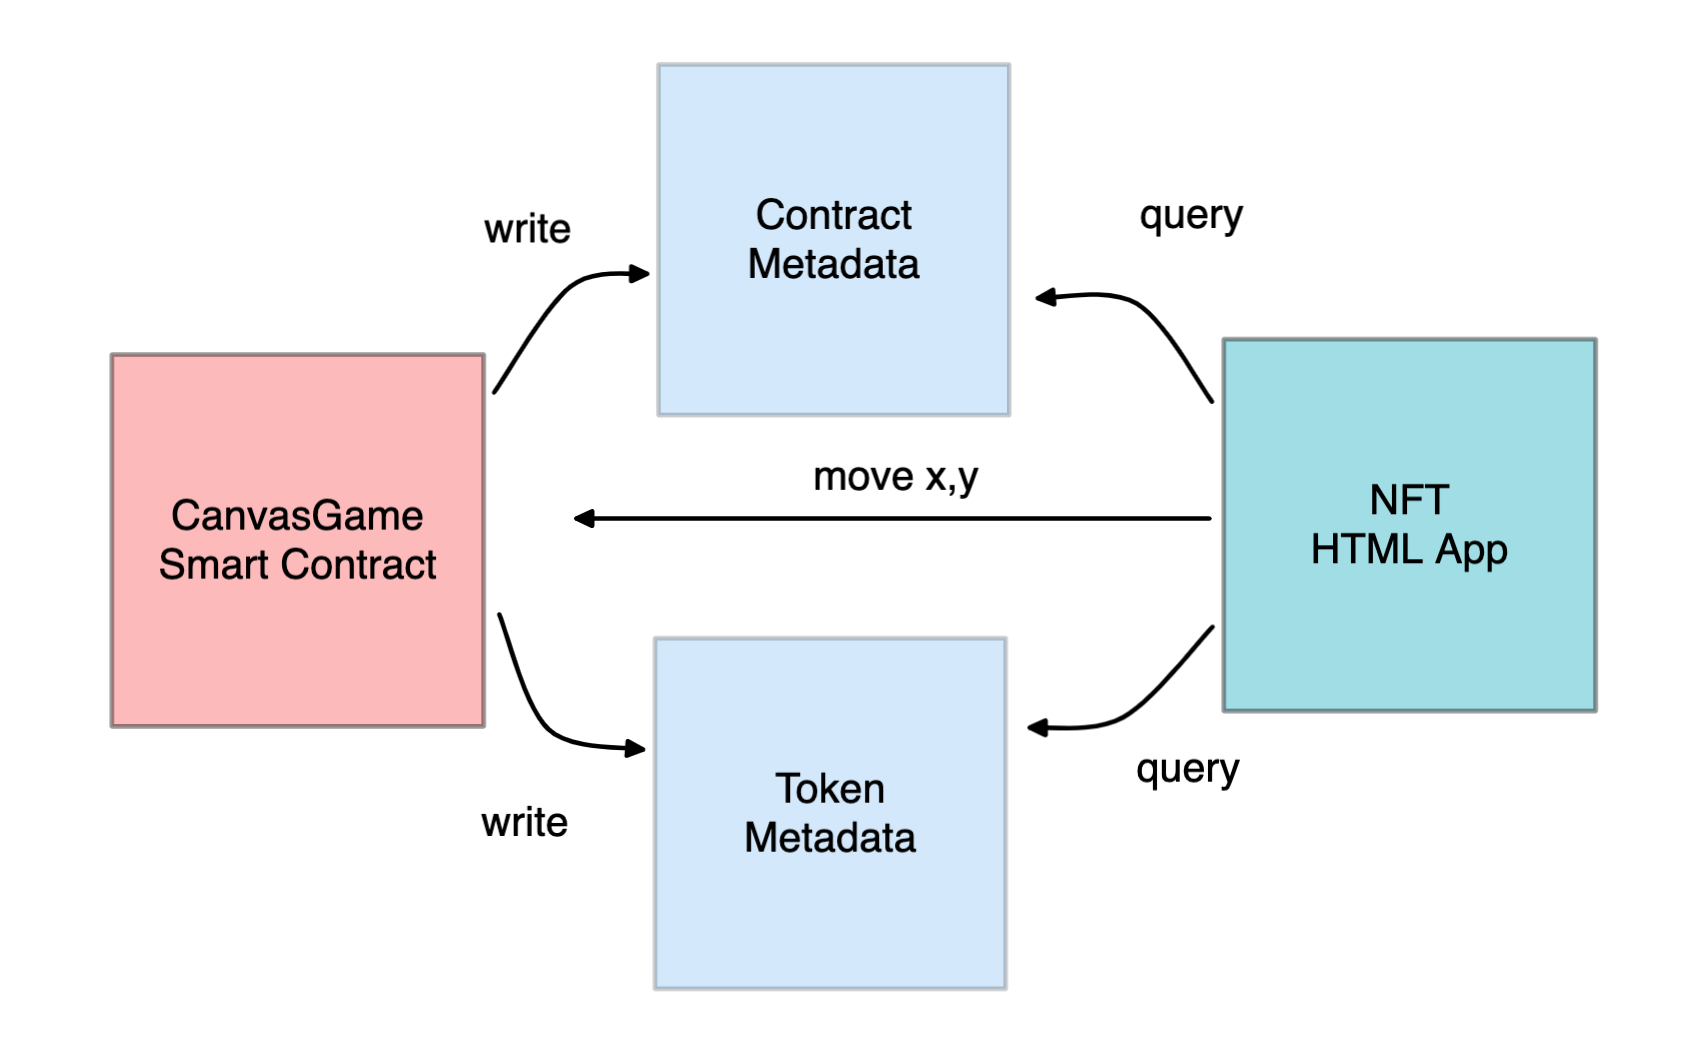
- By owning a pixel, the user controls a token with an X,Y coordinate in the game. They control their pixel through an interface built right on the NFT and a call to the CanvasGame smart contract.
- A custom function in CanvasGame will check the permissions of the calling user and then update the pixel metadata in the Token Metadata table.
- All NFTs will be able to query the latest state from that table to display the updated move.
Setup
We’ll be using Hardhat with OpenZeppelin upgradeable contracts and the Tableland contracts.
npm install @openzeppelin/contracts-upgradeable @tableland/evm
We'll also install some useful Tableland tooling for deploying locally with Hardhat:
npm i -D @tableland/local @tableland/hardhat dotenv
This will allow us to use a local instance of Tableland when we deploy contracts as well as run Hardhat tests.
Repo
Note: if you want to follow the code itself, check out the repo: https://github.com/tablelandnetwork/example-canvas-game
Smart contract scaffolding
Let’s work from a basic smart contract outline and then build out each necessary section. The contract uses OpenZeppelin
's Upgradable and Ownable contracts for managing contract upgrades and owner-only guards. Additional contracts focus on features like pausing, reentrancy security guarding, counter / string utilities, and ERC721 contract-held ownership.
// SPDX-License-Identifier: MIT
pragma solidity ^0.8.12;

import "@openzeppelin/contracts-upgradeable/access/OwnableUpgradeable.sol";
import "@openzeppelin/contracts-upgradeable/proxy/utils/UUPSUpgradeable.sol";
import "@openzeppelin/contracts-upgradeable/security/PausableUpgradeable.sol";
import "@openzeppelin/contracts-upgradeable/security/ReentrancyGuardUpgradeable.sol";
import "@openzeppelin/contracts-upgradeable/token/ERC721/extensions/ERC721URIStorageUpgradeable.sol";
import "@openzeppelin/contracts-upgradeable/token/ERC721/utils/ERC721HolderUpgradeable.sol";
import "@openzeppelin/contracts/utils/Counters.sol";
import "@openzeppelin/contracts/utils/Strings.sol";
import "@tableland/evm/contracts/utils/TablelandDeployments.sol";
import "@tableland/evm/contracts/utils/SQLHelpers.sol";

contract CanvasGame is
    Initializable,
    ERC721URIStorageUpgradeable,
    ERC721HolderUpgradeable,
    OwnableUpgradeable,
    PausableUpgradeable,
    ReentrancyGuardUpgradeable,
    UUPSUpgradeable
{
    using Counters for Counters.Counter;
    Counters.Counter private _tokenIds;

    string private _baseURIString;
    string private _metadataTable;
    uint256 private _metadataTableId;
    string private _tablePrefix;
    // In a separate tutorial, we update this with a Nuxt app that displays x,y
    // and gives you the interface to move x,y.
    string private _externalURL;

    event MakeMove(address caller, uint256 tokenId, uint256 x, uint256 y);

    constructor() {
        _disableInitializers();
    }

    function initialize(
        string memory baseURI,
        string memory externalURL
    ) public initializer {
        __ERC721URIStorage_init("Canvas", "ITM");
        __ERC721Holder_init();
        __Ownable_init(msg.sender);
        __Pausable_init();
        __ReentrancyGuard_init();
        __UUPSUpgradeable_init();

        // Setup steps in our smart contract
    }

    /*
     * `createMetadataTable` initializes the token tables.
     */
    function createMetadataTable()
        external
        payable
        onlyOwner
        returns (uint256)
    {
        // Create token metadata tables
    }

    /*
     * `safeMint` allows anyone to mint a token in this project.
     * Any time a token is minted, a new row of metadata will be
     * dynamically inserted into the metadata table.
     */
    function safeMint(address to) public returns (uint256) {
        uint256 newItemId = _tokenIds.current();

        // Any table updates will go here

        _safeMint(to, newItemId, "");
        _tokenIds.increment();
        return newItemId;
    }

    /*
     * `makeMove` is an example of how to encode gameplay into both the
     * smart contract and the metadata. Whenever a token owner calls
     * make move, they can supply a new x,y coordinate and update
     * their token's metadata.
     */
    function makeMove(uint256 tokenId, uint256 x, uint256 y) public {
        // Check token ownership
        require(this.ownerOf(tokenId) == msg.sender, "Invalid owner");
        // Simple onchain gameplay enforcement
        require(x < 512 && 0 <= x, "Out of bounds");
        require(y < 512 && 0 <= y, "Out of bounds");

        // Any table updates will go here

        emit MakeMove(msg.sender, tokenId, x, y);
    }

    /*
     * `_baseURI` returns the base token URI.
     */
    function _baseURI() internal view override returns (string memory) {
        return _baseURIString;
    }

    /*
     * `tokenURI` is an example of how to turn a row in your table back into
     * erc721 compliant metadata JSON. here, we do a simple SELECT statement
     * with function that converts the result into json.
     */
    function tokenURI(
        uint256 tokenId
    ) public view virtual override returns (string memory) {
        require(
            _exists(tokenId),
            "ERC721URIStorage: URI query for nonexistent token"
        );

        string memory base = _baseURI();

        // Give token viewers a way to get at our table metadata
    }

    /*
     * `setExternalURL` provides an example of how to update a field for every
     * row in an table.
     */
    function setExternalURL(string calldata externalURL) external onlyOwner {
        _externalURL = externalURL;
    }

    /**
     * @dev See {UUPSUpgradeable-_authorizeUpgrade}.
     */
    function _authorizeUpgrade(address) internal view override onlyOwner {} // solhint-disable no-empty-blocks
}
Creating contract owned tables
Any contract can call the Tableland network to create new tables. When a contract does so, it is automatically made the owner of the table and has full write and update abilities on the data. This is a handy feature that allows you to dynamically create metadata tables from your smart contract and then mutate them through custom functions.
Let’s update the initialize method before we create tables after we deploy the contract. Note that the current methods with a prefixed __ are initializers for the inherited contracts. If you'd like to change the token name and ticker, alter the parameters in __ERC721URIStorage_init.
string private _baseURIString;
string private _metadataTable;
uint256 private _metadataTableId;
string private _tablePrefix = "canvas";

function initialize(
    string memory baseURI,
    string memory externalURL
) public initializer {
  __ERC721URIStorage_init("Canvas", "ITM");
  __ERC721Holder_init();
  __Ownable_init(msg.sender);
  __Pausable_init();
  __ReentrancyGuard_init();
  __UUPSUpgradeable_init();

    _baseURIString = baseURI;
    _tablePrefix = "canvas";
    _externalURL = externalURL;
}
Then, createMetadataTable can be called and use this information as a post-deploy step. We'll set the _metadataTableId and _metadataTable name after calling TablelandDeployments.get().create() to create the table.
function createMetadataTable()
    external
    payable
    onlyOwner
    returns (uint256)
{
    _metadataTableId = TablelandDeployments.get().create(
        address(this),
        /*
          *  CREATE TABLE prefix_chainId (
          *    int id,
          *    int x,
          *    int y
          *  );
          */
        SQLHelpers.toCreateFromSchema(
            "id int, x int, y int",
            _tablePrefix
        )
    );

    _metadataTable = SQLHelpers.toNameFromId(_tablePrefix, _metadataTableId);

    return _metadataTableId;
}
We handled a few steps here.
- We created global variables in our contract to track the
tableIdand final name. Table names are assigned on create time, so you’ll need to do a bit of string concatenation to get your final name. - Next, we connected to Tableland using the address provided by
TablelandDeployments. - We called the
createmethod and gave it a table prefix ("canvas") and a schema, just like any CREATE table command in SQL:id int, x int, y int. Schemas match our SQL spec.
Our final table will look like this (and have some actual data in the table itself):
| id INT | x INT | y INT |
|---|---|---|
| - | - | - |
We’ll use this data to store a row per token minted. Each tokenId will be stored in the id column and can be used later to query for the single row response.
When we deploy the smart contract, it will create a table on Tableland that only can be updated by the smart contract itself!
Storing data from your smart contract
In our simple game, we want to allow anyone to mint a pixel, that pixel will exist as an NFT. NFT metadata is often stored on centralized servers or as static files on IPFS. Neither of those options are easily updated right from a smart contract, so we’re going to store our metadata in our dynamic table owned by the smart contract. To do so, we’ll add an INSERT statement that will update our metadata table every time a new token is minted.
function safeMint(address to) public returns (uint256) {
    uint256 newItemId = _tokenIds.current();
    // Insert table values upon minting.
    TablelandDeployments.get().mutate(
        address(this),
        _metadataTableId,
        SQLHelpers.toInsert(
            _tablePrefix,
            _metadataTableId,
            "id,x,y",
            string.concat(
                Strings.toString(newItemId),
                ",0,0"
            )
        )
    );
    _safeMint(to, newItemId, "");
    _tokenIds.increment();
    return newItemId;
}
We only added one new command, but let’s walk through the whole function now.
- Anyone can call
safeMint(gas only!). - There is a global variable in the contract tracking the
tokenIds minted. The first one will be0and go up every timesafeMintis successfully called. - Next, we call the
mutatemethod on Tableland and INSERT a row into our metadata table. The SQL called looks like,INSERT INTO {your_metadata_table_name} (id, x, y) VALUES (tokenId, 0, 0). That’s the new default 0,0 starting point for every new NFT owner. - Finally, we call the
safeMintto transfer ownership to the caller and increment our token IDs.
We’ll leave the _externalURL as a placeholder for a separate tutorial were we create the NFT app to view the game.
View the contract’s metadata table
Since the metadata table is created at deploy time, you’ll need to create a read method on your smart contract to get the final table name in order to query it. Let’s just add a read method to get back a gateway request for the table!
function metadataURI() public view returns (string memory) {
  string memory base = _baseURI();
  return string.concat(
    base,
    "query?statement=", // Simple read query setup
    "SELECT%20*%20FROM%20",
    _metadataTable
  );
}
After your contract is deployed, you can call this method so you can view the metadata table directly!
View the token's metadata
The token URI should be updated to make a SQL read query at the Tableland gateway:
SELECT
  json_object(
    'name', 'Token #' || id,
    'external_url', '<external_url>',
    'attributes',
    json_array(
      json_object(
        'display_type', 'number',
        'trait_type', 'x',
        'value', x
      ),
      json_object(
        'display_type', 'number',
        'trait_type', 'y',
        'value', y
      )
    )
  )
FROM
  <prefix_chainId_tableId>
WHERE
  id = <tokenId>
When deploying, we'll use JavaScript to set the base URI that the tokenURI will use when appending the URL encoded query above. Namely, the base will be an HTTPS URL with an endpoint of /api/v1/query?unwrap=true&extract=true&statement=.
function tokenURI(
    uint256 tokenId
) public view virtual override returns (string memory) {
    require(
        _exists(tokenId),
        "ERC721URIStorage: URI query for nonexistent token"
    );

    string memory base = _baseURI();

    return
        string.concat(
            base,
            "query?unwrap=true&extract=true&statement=", // Set up an unwrap + extract for a single token
            "SELECT%20json_object%28%27name%27%2C%20%27Token%20%23%27%20%7C%7C%20id%2C%20%27external_url%27%2C%20",
            SQLHelpers.quote(_externalURL),
            "%2C%20%27attributes%27%2Cjson_array%28json_object%28%27display_type%27%2C%20%27number%27%2C%20%27trait_type%27%2C%20%27x%27%2C%20%27value%27%2C%20x%29%2Cjson_object%28%27display_type%27%2C%20%27number%27%2C%20%27trait_type%27%2C%20%27y%27%2C%20%27value%27%2C%20y%29%29%29%20FROM%20",
            _metadataTable,
            "%20WHERE%20id=",
            Strings.toString(tokenId)
        );
}
Setting the external link
With setExternalURL, we can implement some optional functionality that allows only the contract owner to update this value. For example, if you were to create some renderer of onchain data, the link can be updated to a different value from the existing one chosen during the initialize call. Here, the example assume the URL would be something like https://my.example-render.com?tokenId= where ?tokenId= is some query parameters for the specific token ID. To make this possible, you could do something like appending ||'?tokenId='||id to the external_url JSON value, thus, turning every row's URL into including get param for tokenId:
json_object(
  'name', 'Token #' || id,
  'external_url', '<externalUrl>'||'?tokenId='||id ,
  ...
)
Where <externalUrl> is passed by the smart contract.
Allow the user to move their pixel
Since the metadata table is owned by the smart contract, nobody can change the coordinates of their x, y pixel directly. There are a few ways to achieve the per-user ACL on Tableland, but here we’ll use the fully smart-contract controlled approach.
Let’s update the function called, makeMove so that it can be called by any token owner to update their x,y position.
function makeMove(uint256 tokenId, uint256 x, uint256 y) public {
  // Check token ownership
  require(this.ownerOf(tokenId) == msg.sender, "Invalid owner");
  // Simple onchain gameplay enforcement
  require(x < 512 && 0 <= x, "Out of bounds");
  require(y < 512 && 0 <= y, "Out of bounds");
  // Update the row in tableland
  string memory setters = string.concat(
      "x=",
      Strings.toString(x),
      ",y=",
      Strings.toString(y)
  );
  // Only update the row with the matching `id`
  string memory filters = string.concat("id=", Strings.toString(tokenId));
  // Update the table
  TablelandDeployments.get().mutate(
      address(this),
      _metadataTableId,
      SQLHelpers.toUpdate(
          _tablePrefix,
          _metadataTableId,
          setters,
          filters
      )
  );

  emit MakeMove(msg.sender, tokenId, x, y);
}
Now this function does a few really neat things.
- It enforces that only a token owner can call
makeMoveon a token they own. - It enforces a basic set of rules where token owners can only move on a 512 x 512 pixel grid.
- If both of those pass, it will update the metadata table on Tableland. It does so by running the
mutatecommand again, but this time doing a simpleUPDATEcommand, changing thexandyfields in the row that matches the tokenId.
TADA! You now have mutable data with immutable rules! A simple game with dynamic data built directly into an NFT.
Deployment
The repo has some available scripts. The primary one needed is the deploy.ts script, which will:
- Deploy the Canvas contract.
- Create metadata tables.
- (Optional) mint a token to an address.
If you're deploying on Local Tableland, start by spinning up a local instance and then running the script in a separate window:
npx hardhat node --network local-tableland
# In a separate window
npx hardhat run scripts/deploy.ts --network localhost
You should see some information logged upon running the script:
Proxy deployed to: 0x5FC8d32690cc91D4c39d9d3abcBD16989F875707 on localhost
^Add this to your 'hardhat.config.ts' file's 'deployments'
New implementation address: 0xDc64a140Aa3E981100a9becA4E685f962f0cF6C9

Running post deploy...
Metadata table ID: 2
Token ID: 0

Check out the mutated table data:
http://localhost:8080/api/v1/query?statement=SELECT%20\*%20FROM%20canvas_31337_2
And the specific token's URI:
http://localhost:8080/api/v1/query?unwrap=true&extract=true&statement=SELECT%20json_object%28%27name%27%2C%20%27Token%20%23%27%20%7C%7C%20id%2C%20%27external_url%27%2C%20'not.implemented.com'%2C%20%27attributes%27%2Cjson_array%28json_object%28%27display_type%27%2C%20%27number%27%2C%20%27trait_type%27%2C%20%27x%27%2C%20%27value%27%2C%20x%29%2Cjson_object%28%27display_type%27%2C%20%27number%27%2C%20%27trait_type%27%2C%20%27y%27%2C%20%27value%27%2C%20y%29%29%29%20FROM%20canvas_31337_2%20WHERE%20id=0
And at the gateway, the data should show all table values—which should also reflect the minted / mutated token metadata from the deploy script:
[
  {
    "id": 0,
    "x": 10,
    "y": 10
  }
]
If you're deploying to live networks, you'll need to copy the .env.example file to a .env file. Then, update the keys accordingly. For example, if you'd like to deploy to Polygon Amoy, you'll need to update the .env values listed in hardhat.config.js:
// ...
"polygon-amoy": {
  url: `https://polygon-amoy.alchemyapi.io/v2/${
    process.env.POLYGON_AMOY_API_KEY ?? ""
  }`,
  accounts:
    process.env.POLYGON_AMOY_PRIVATE_KEY !== undefined
      ? [process.env.POLYGON_AMOY_PRIVATE_KEY]
      : [],
},
// ...
The deploy script will get Tableland registry smart contract addresses and the respective gateway base URI before running through deployment and test minting. Note base URI is added here to enable the /query endpoint for SQL SELECT statements to be written.
import { ethers, upgrades, network } from "hardhat";
import {
  proxies,
  baseURIs,
  TablelandNetworkConfig,
} from "@tableland/evm/network";

async function main() {
  // Get the Tableland registry address for the current network
  const registryAddress =
    network.name === "localhost"
      ? proxies["local-tableland" as keyof TablelandNetworkConfig]
      : proxies[network.name as keyof TablelandNetworkConfig];
  // Get the baseURI with only the endpoint `/api/v1/` instead of an appended `/tables`
  let baseURI =
    network.name === "localhost"
      ? baseURIs["local-tableland" as keyof TablelandNetworkConfig]
      : baseURIs[network.name as keyof TablelandNetworkConfig];
  baseURI = baseURI.match(/^https?:\/\/[^\/]+\/[^\/]+\/[^\/]+\/?/)![0];

  if (!registryAddress)
    throw new Error("cannot get registry address for " + network.name);
  if (!baseURI) throw new Error("cannot get base URI for " + network.name);

  // Deploy the Canvas contract.
  const CanvasGame = await ethers.getContractFactory("CanvasGame");
  const canvasGame = await upgrades.deployProxy(
    CanvasGame,
    [baseURI, "not.implemented.com"],
    {
      kind: "uups",
    }
  );
  await canvasGame.waitForDeployment();
  // Check upgradeability.
  console.log("Proxy deployed to:", canvasGame.address, "on", network.name);
  const impl = await upgrades.erc1967.getImplementationAddress(
    canvasGame.address
  );
  console.log("^Add this to your 'hardhat.config.ts' file's 'deployments'");
  console.log("New implementation address:", impl);

  // Run post deploy table creation.
  console.log("\nRunning post deploy...");
  // Create our metadata table
  let tx = await canvasGame.createMetadataTable();
  let receipt = await tx.wait();
  const tableId = receipt.events[0].args.tokenId;
  console.log("Metadata table ID:", tableId.toString());

  // For fun—test minting and making a move.
  const accounts = await ethers.getSigners();
  tx = await canvasGame.connect(accounts[0]).safeMint(accounts[0].address);
  receipt = await tx.wait();
  const [, transferEvent] = (await receipt.events) ?? [];
  const tokenId = await transferEvent.args!.tokenId;
  console.log("Token ID:", ethers.BigNumber.from(tokenId).toNumber());

  // Query all table values after mutating.
  // Note the `makeMove` method's SQL:
  // UPDATE canvas_{chainId}_{tokenId} SET x = ${x}, y = ${y} WHERE id = ${tokenId};
  await canvasGame
    .connect(accounts[0])
    .makeMove(ethers.BigNumber.from(tokenId).toNumber(), 10, 10); // (tokenId, x, y)
  await tx.wait();
  // Query all table values after mutating.
  const gateway = await canvasGame.metadataURI();
  console.log(`\nCheck out the mutated table data:`);
  console.log(gateway);
  // Get the specific token's URI.
  const tokenURI = await canvasGame.tokenURI(tokenId);
  console.log(`And the specific token's URI:`);
  console.log(tokenURI);
}

main().catch((error) => {
  console.error(error);
  process.exitCode = 1;
});
Other scripts
If you'd like to change the x & y coordinates, you can also use the move.ts script. Be sure update the tokenId and coordinate values within the script itself.
npx hardhat run scripts/move.ts --network localhost
Since the contracts can be upgraded, you can also deploy new instances with upgrade.ts:
npx hardhat run scripts/upgrade.ts --network localhost
There is also a script to verify the contract, which makes the methods accessible via a UI but is only possible on live networks. For example, this would verify on Polygon Amoy with the proxy address located in hardhat.config.ts's deployments variable:
npx hardhat run scripts/verify.ts --network polygon-amoy
Testing
A very basic test script is also provided. You can run it with npm run test, which does the following:
npx hardhat --network localhost test
Live on Polygonscan
You can play with the functions described above, safeMint() and makeMove() deployed demo contract. The screenshots below walk through general block explorer UI usage, but you can also choose to do these things programmatically.
Connect to web3
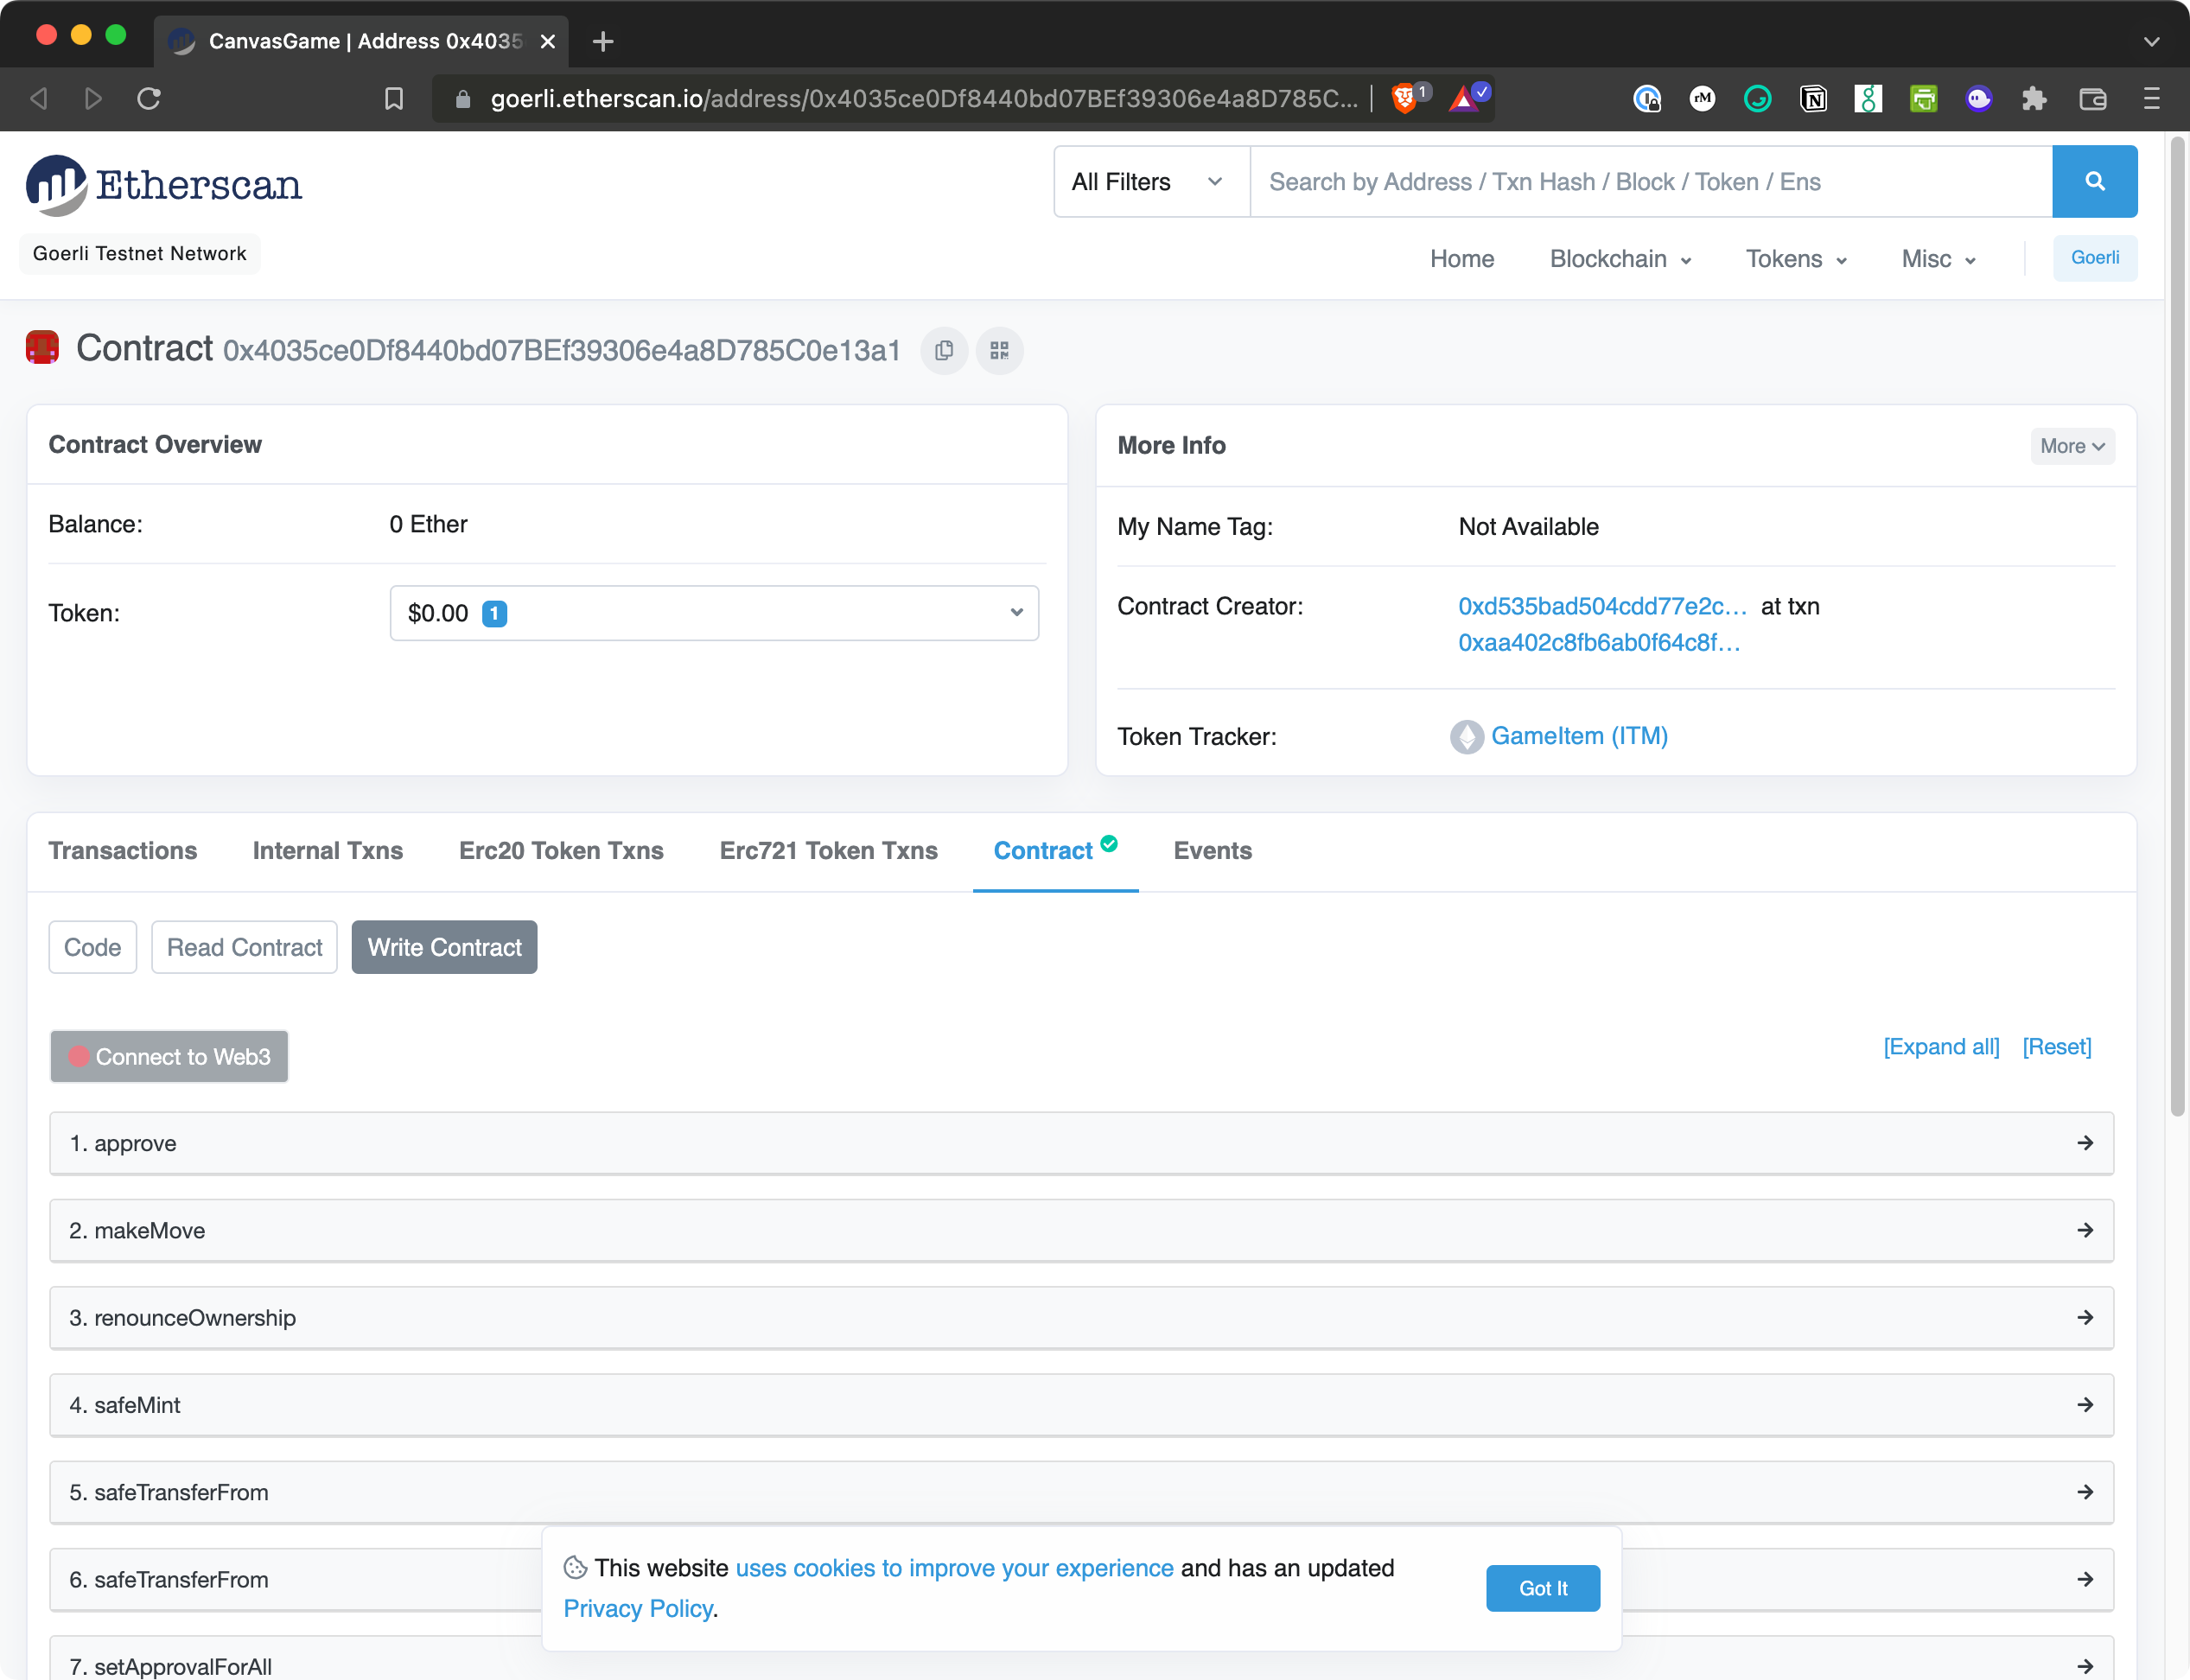
- You’ll need a wallet connected to Polygon Amoy.
- You’ll need some test MATIC tokens from one of the available faucets.
- You’ll need to click the
Connect to Web3button in Etherscan shown above.
Run safeMint()

- Click the
safeMintdropdown in Etherscan. - Paste your public key in the
to (address)field. - Click Write.
- Next, you’ll want to grab the transaction from your wallet. Once confirmed, it will tell you the token ID you just minted.
Pending transaction in wallet
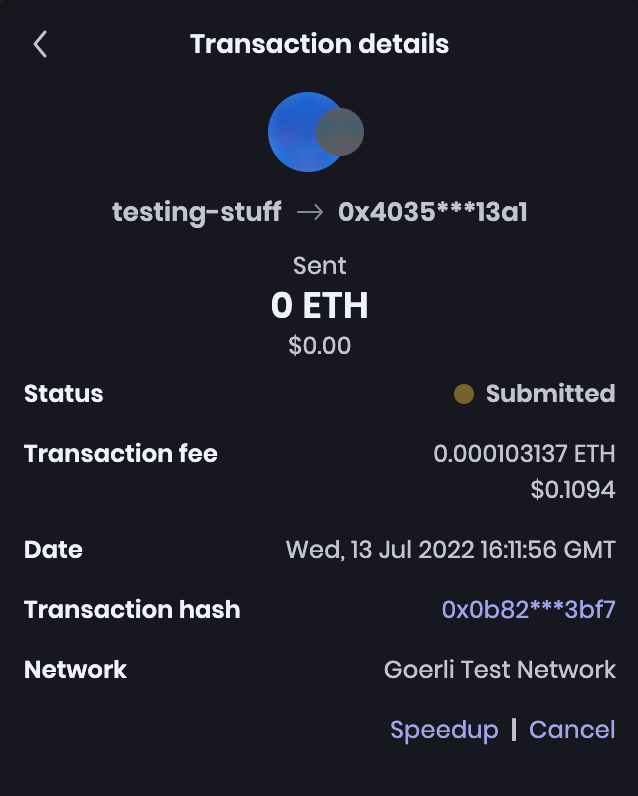
Click the transaction hash or similar in your wallet to see the transaction on Etherscan. The transaction will be pending for a number of seconds, depending on the chain you're using.
Locate token ID in completed transaction
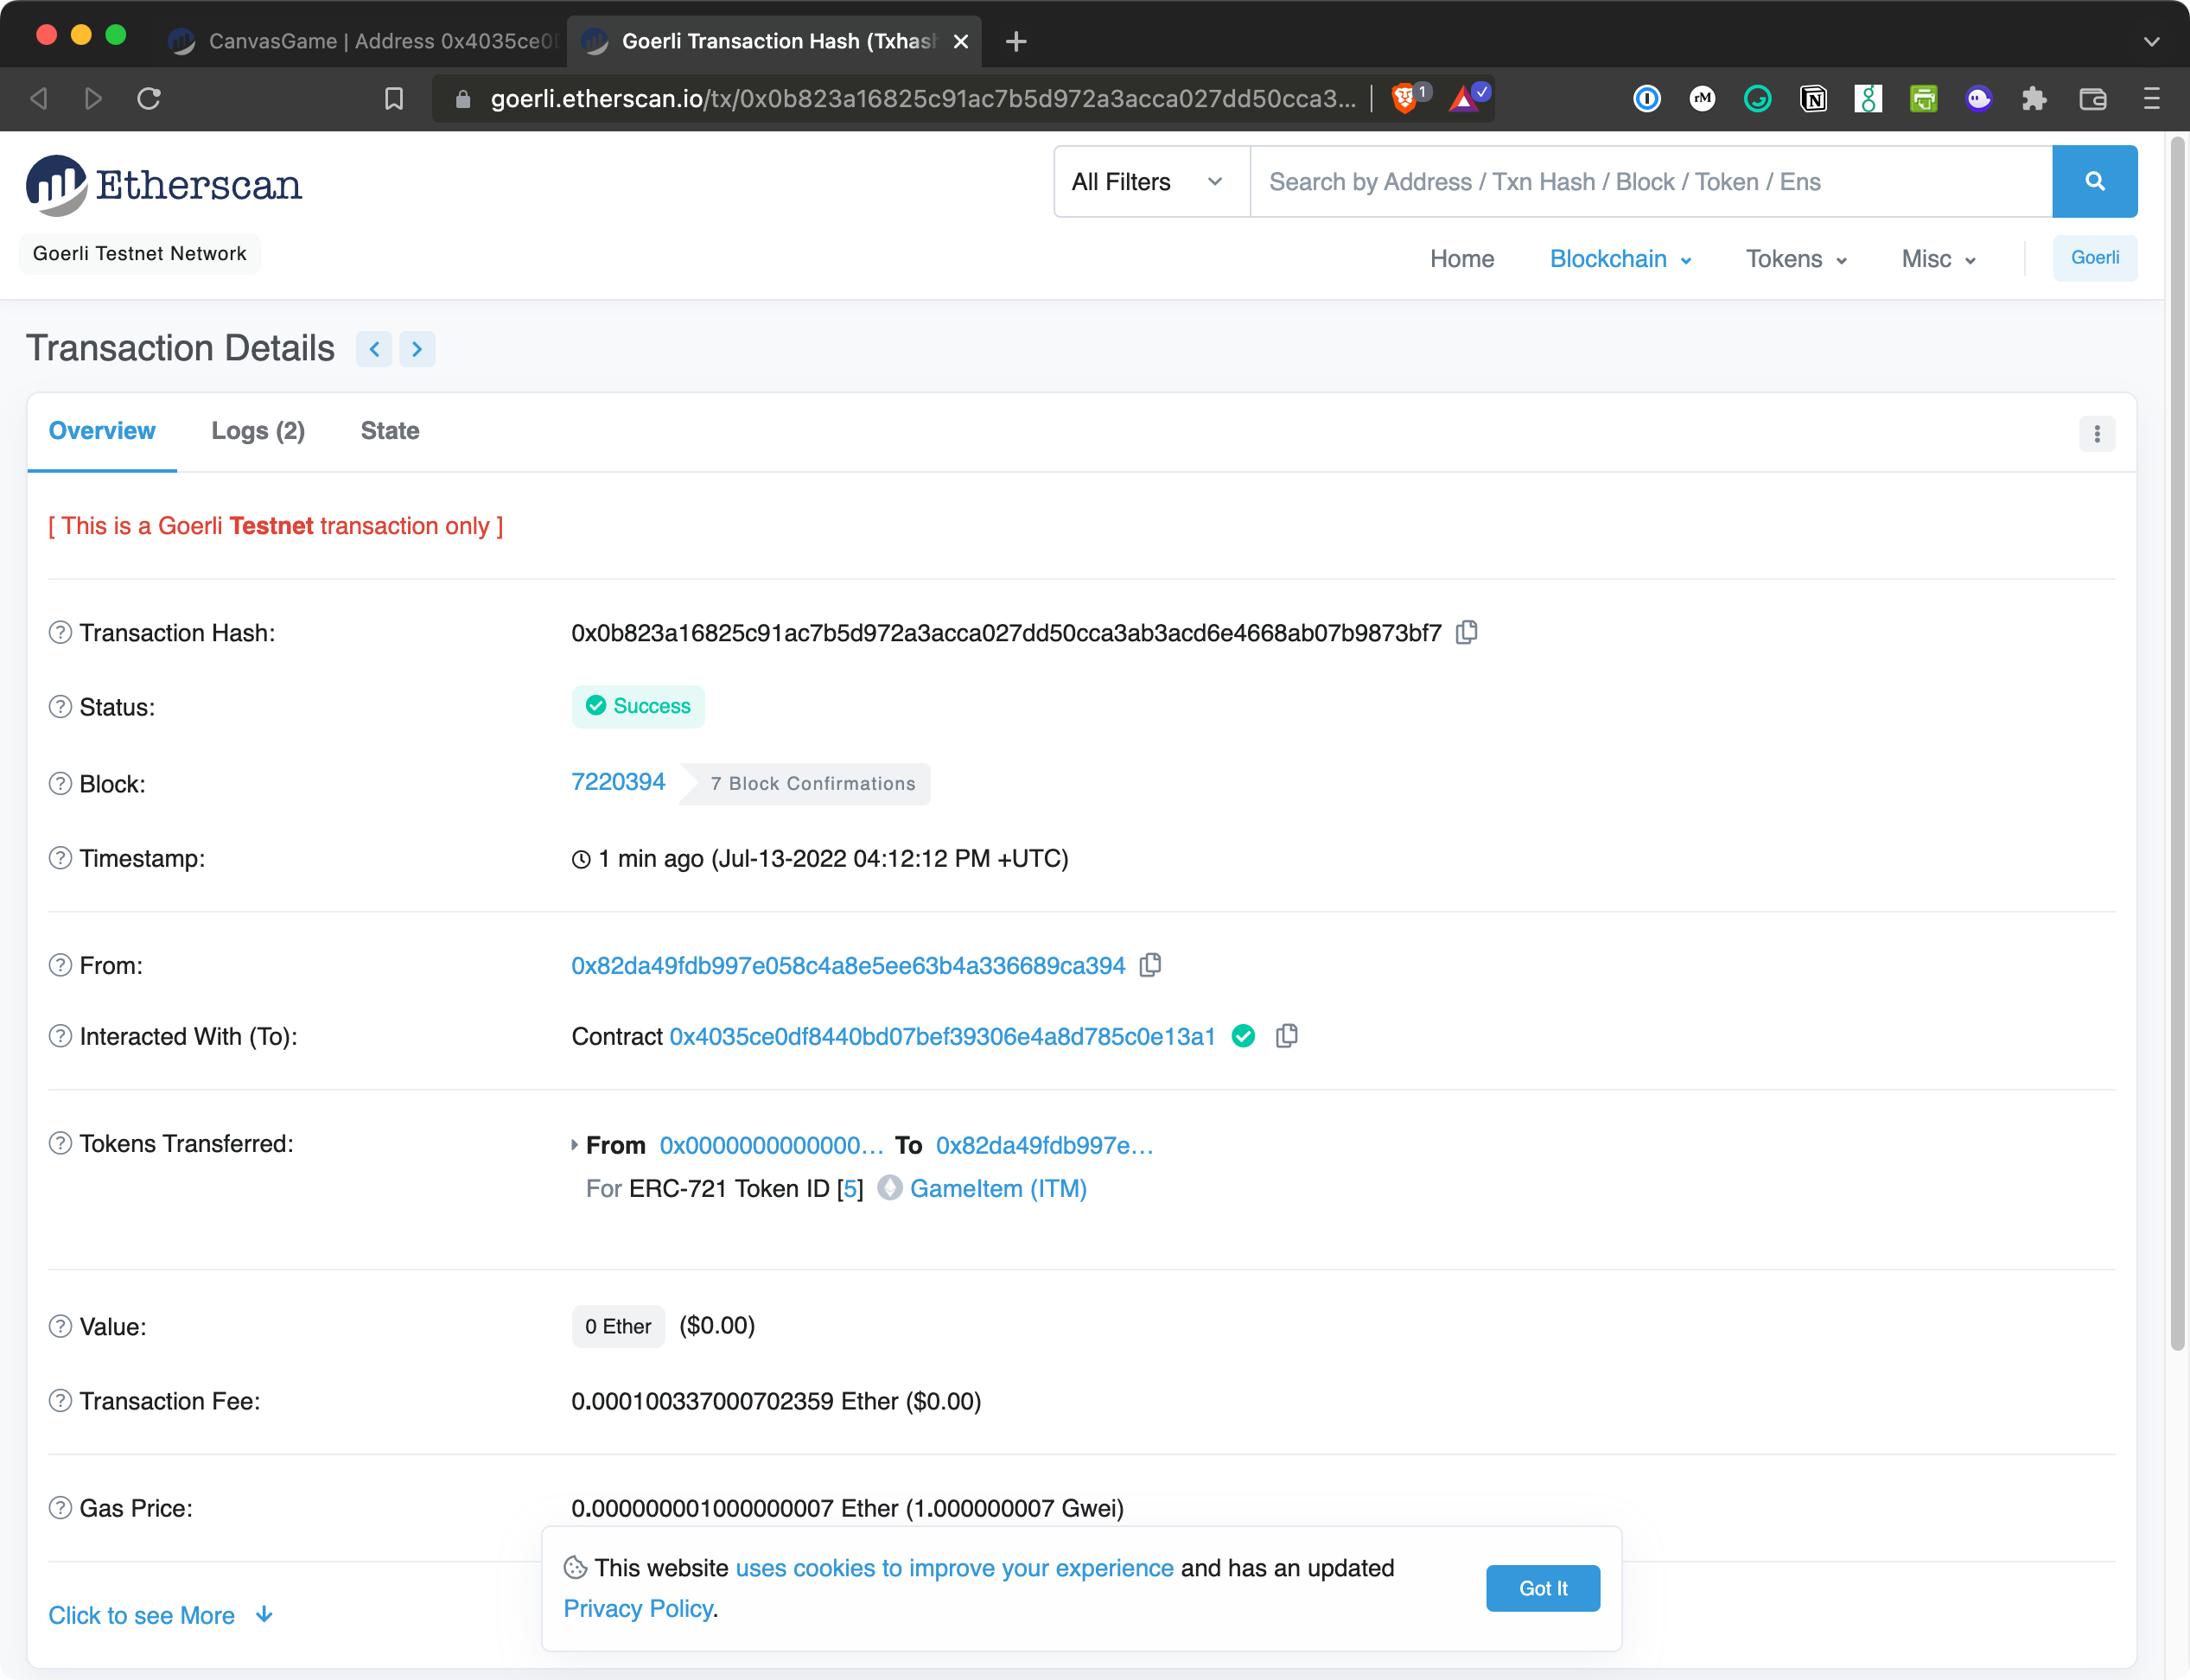
Now, you can grab the token ID from the Tokens Transferred section. For example, token ID 0.
Run makeMove()
Now that you own a token, you will be able to move it on the canvas. Note that we haven’t built the display side of this token yet, so you’ll need to use your imagination.
You can find your current pixel location by querying the Tableland gateway. The URL would be as follows if running locally:
http://localhost:8080/api/v1/query?unwrap=true&extract=true&statement=SELECT%20json_object%28%27name%27%2C%20%27Token%20%23%27%20%7C%7C%20id%2C%20%27external_url%27%2C%20'not.implemented.com'%2C%20%27attributes%27%2Cjson_array%28json_object%28%27display_type%27%2C%20%27number%27%2C%20%27trait_type%27%2C%20%27x%27%2C%20%27value%27%2C%20x%29%2Cjson_object%28%27display_type%27%2C%20%27number%27%2C%20%27trait_type%27%2C%20%27y%27%2C%20%27value%27%2C%20y%29%29%29%20FROM%20canvas_31337_2%20WHERE%20id={YOUR_ID_HERE}
Default position
You may have noted above that every new token has a default position of 0,0. You should see that reflected in the response above.
Calling makeMove()
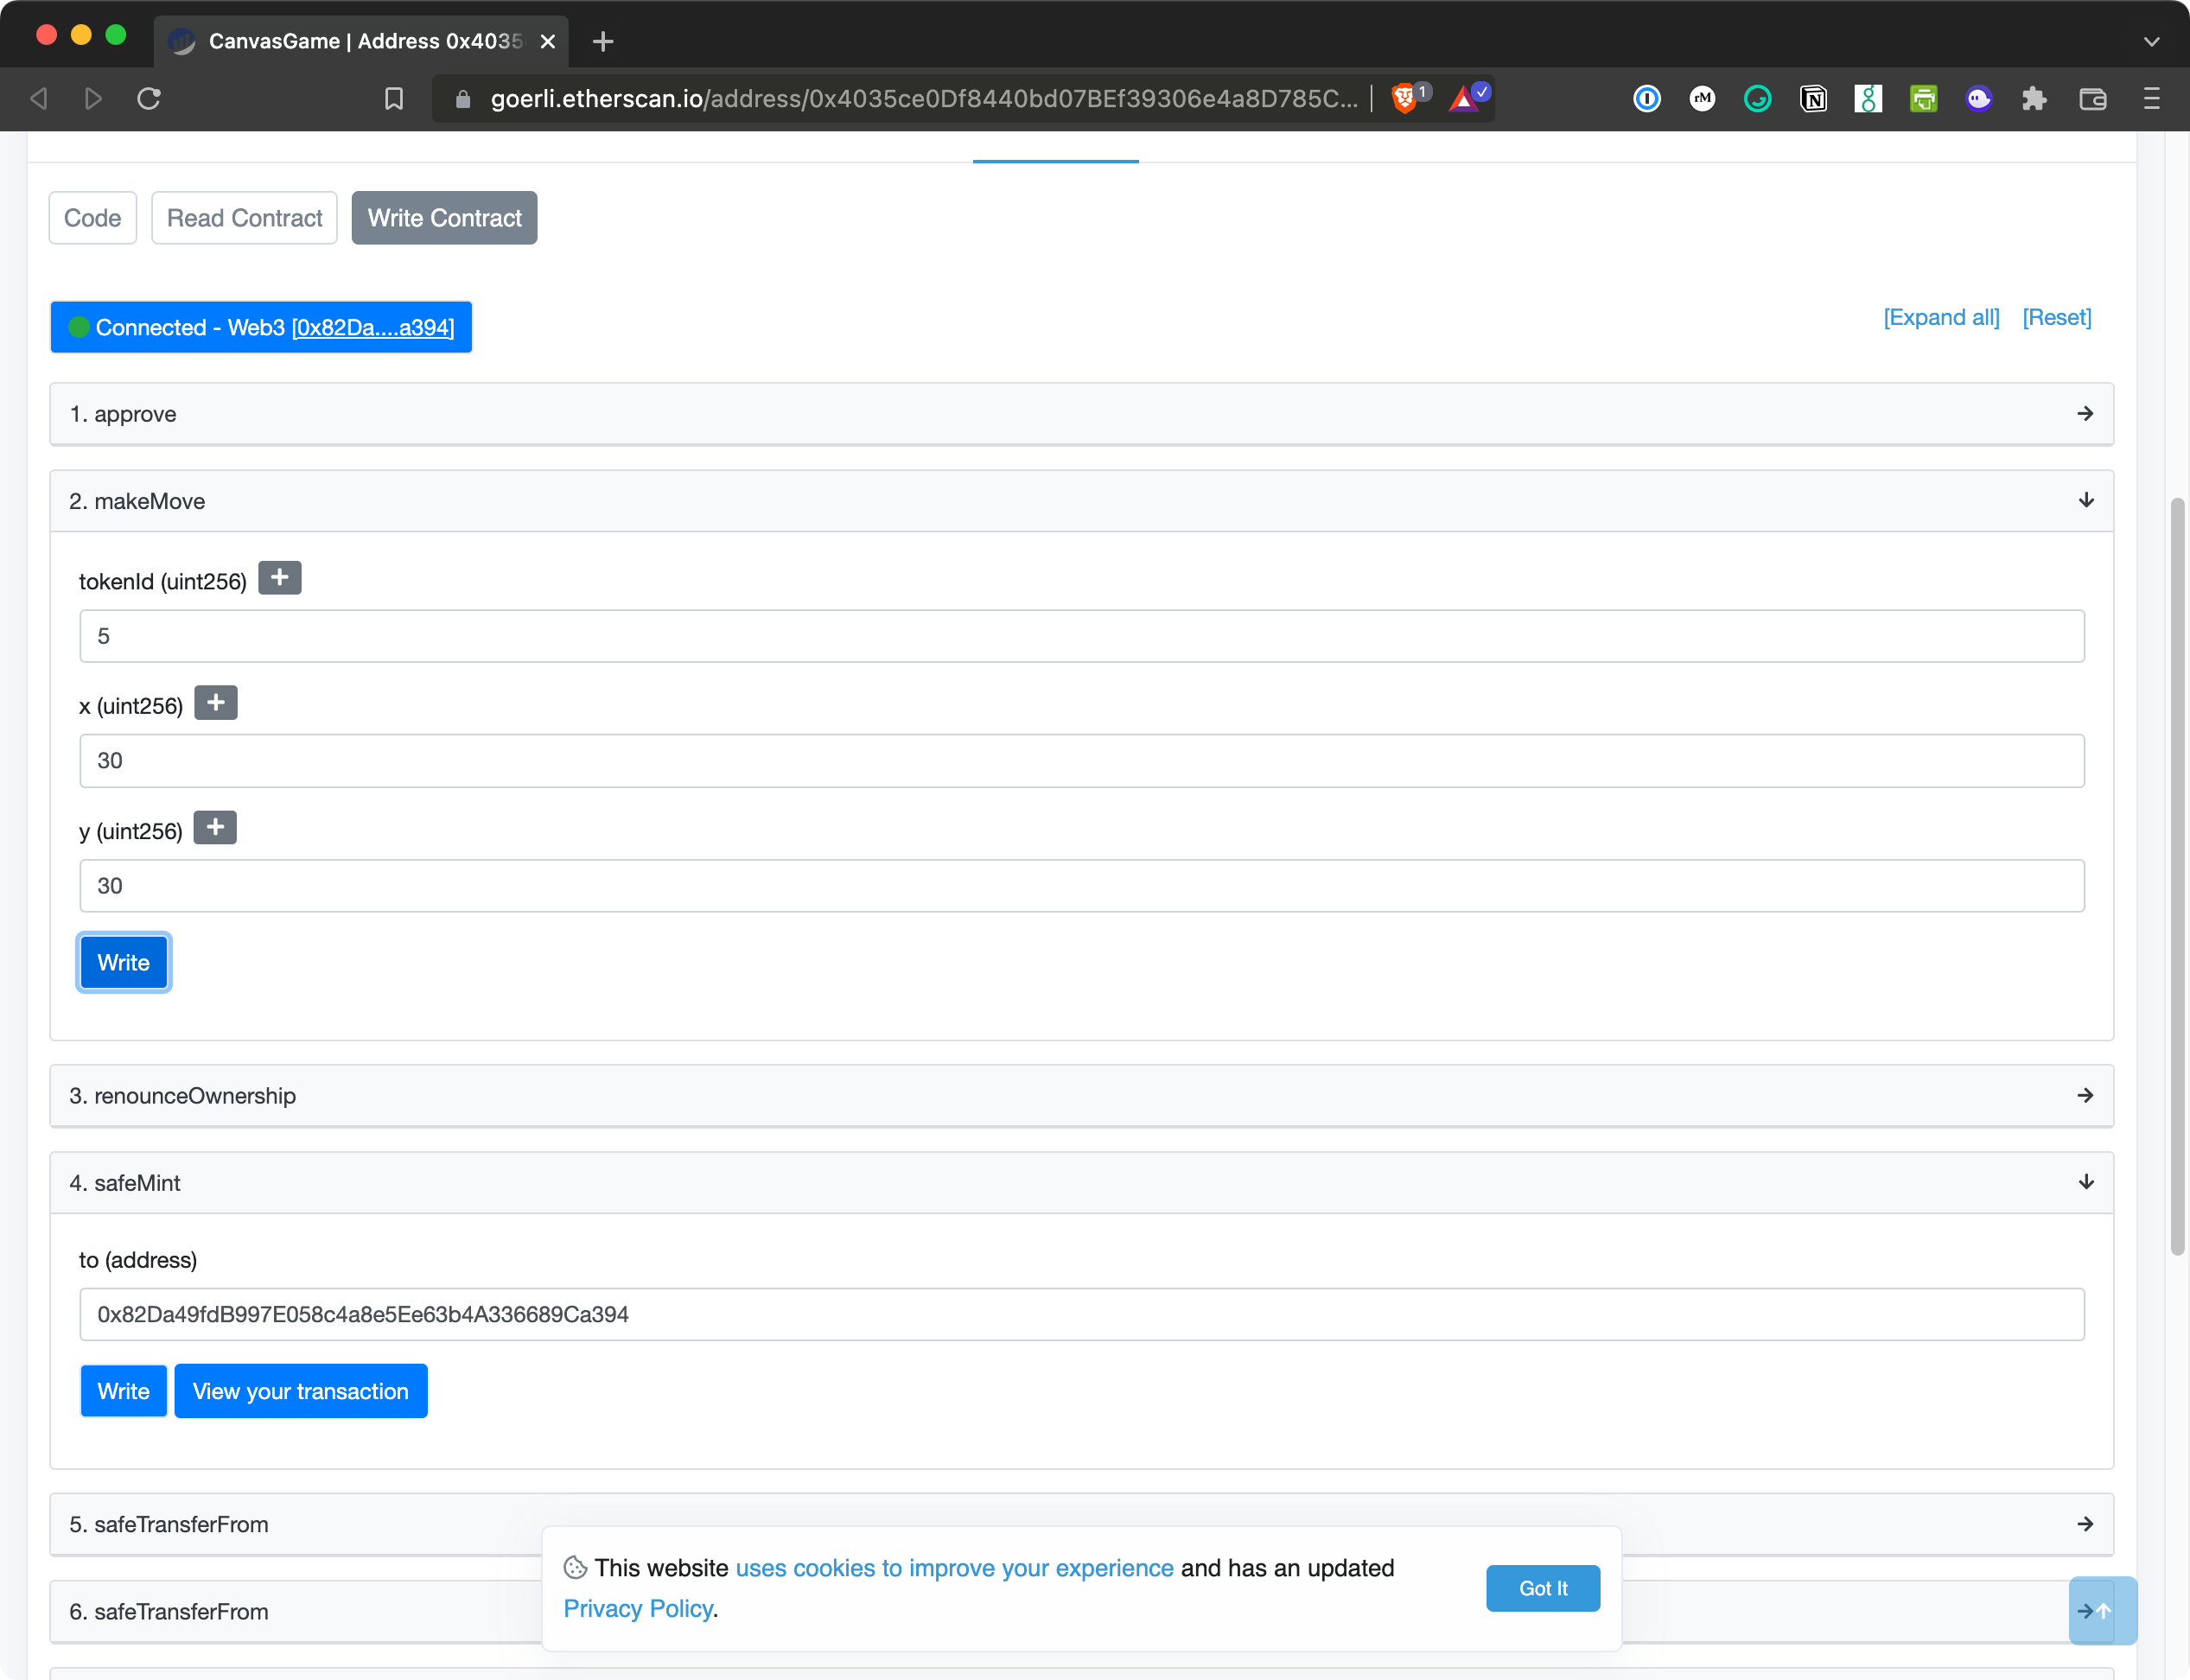
Now, you can head back to the block explorer contract and go to the makeMove drop down. Enter your tokenId and the new position you want for your pixel. Remember in the makeMove() function above, we only allow 0 <= x <= 512 and 0<= y <= 512.
Once you’ve entered your new coordinates, hit Write and confirm the transaction in your wallet. Once the transaction is completed, you can query your token with the Tableland gateway (same URL as above) to confirm the move took place!
Enhancements
Here are a few of the next things you can do:
- Create an NFT app that reads the metadata table and displays an owner’s pixel position dynamically.
- Create dynamic contract metadata for display in marketplaces and platforms.
- Enable proxy contracts by granting table permissions to newly deployed contract versions.